Friday, December 26, 2008

惊喜啊,硬盘分区类型变光驱的更改搞定啦

还是前两天的那个问题,我把分区H和DVD光驱G的盘符颠倒了一下,但是不知为什么硬盘分区H的类型也成了DVD光驱。

每次找东西看到H盘那个DVD的图标总是很郁闷。今天在网上找了好久好久也没遇到个我这样的问题,就算遇到了大家也都说重装机,重分区什么的。最后,hoho凭着我超强的毅力在注册表里面找了个遍找到了解决的办法,现在放出来:

方法非常简单,打开注册表,定位到
HKEY_LOCAL_MACHINE\SOFTWARE\Microsoft\Windows\CurrentVersion\Explorer\DriveIcons
下面的子键应该只有一个H就是我的光驱盘符,但是现在多了一个G(图中红色方框中的)也就是上图中的VMWARE分区的盘符,只要删除多出来的那个G子键就可以了。

呶~好了吧!

给RHEL5装上vmware-tools

安装完RHEL5以后不能安装VMware tools。在以前的部分版本中很容易就能安装上,就算是部分安装不上的也可以通过一个叫vmware-any-any-udate114.tar.gz的文件进行修正。可惜到了RHEL5就不行了,这里给出解决办法。
首先下载VMware Workstation 6.0.3 的 VMware tools for linux。
地址是:http://www.vmware.cn/Soft/1053.html 下载其中的linux.iso文件,用工具下,可能有点慢。
下载完成之后给RHEL5挂载LiveCD。先查看系统本身的内核:

# rpm -qa grep
kernel
kernel-headers-2.6.18-8.el5
kernel-xen-2.6.18-8.el5

用管理员帐号登陆并安装以下两个包:

# su
# rpm -ivh /media/CDROM/Server/kernel-2.6.18-8.el5.i686.rpm
# rpm -ivh /media/CDROM/Server/kernel-xen-devel-2.6.18-8.el5.i686.rpm
这两个包必须同时安装上,不然据说会有很严重的问题说。
卸载光驱或者重新启动,这时grub菜单会多出来一个-xen的启动选项。然后再挂载linux.iso(网站上下载的linux.iso需要将linux.iso解压出来,放置在哪无所谓)。在RHEL里面复制VMwareTools-6.0.3-80004.tar.gz到桌面上。

# tar -zxf VMwareTools-6.0.3-80004.tar.gz
# cd vmware-tools-distrib
# su
# ./vmware-install.pl
里面除了选项为NO的改成YES以外其他的都保持默认。设置完分辨率后屏幕就变黑了,等出完四行字就算安装完成了。这时候重启,再进入RHEL5就可以随意的与宿主机互交了。很简单吧!

Thursday, December 25, 2008

XP下 Compaq V3416TX 本本光驱盘符丢失及驱动错误的解决办法

前两天设置调换了一下H盘和G盘(光驱盘符)的盘符名,不记得是不是设置完之后出现的错误,今天发现光驱盘符不见了,查了下驱动发现在MATSHITA DVD-RAM UJ-850S的上面多了一个感叹号,磁盘管理里面也不见了DVD光驱。郁闷的很,本来准备重装呢,因为正在和女朋友聊天不敢耽误了,于是乎找了很多的帮助居然解决了。但原理我实在搞不懂,这里就把我的步骤摆出来,如果有同样问题的,不妨试试,指不定哪一步就对了。

1.打开注册表找到HKEY_LOCAL_MACHINE\SYSTEM\CurrentControlSet\Services\Cdrom 将右边的Autorun改成1。

2.打开注册表找到HKEY_LOCAL_MACHINE\SYSTEM\CurrentControlSet\Control\Class\{4D36E965-E325-11CE-BFC1-08002BE10318} 删除里面的UpperFilters 和 LowerFilters 两个子项(我的注册表里面只有UpperFilters,就删除这一个好了)。在删除 UpperFilters 和 LowerFilters 之前,必须确保您处于适当的注册表子项位置。要确认您处于适当的注册表子项位置,请确保 Default 的数据数值为 DVD/CD-ROM(我这里是“DVD/CD-ROM 驱动器”),且 Class 的数据数值为 CDROM。

3.在“设备管理器”里卸载光驱驱动,我的就是卸载MATSHITA DVD-RAM UJ-850S。

4.由于在外国网站上看到有因为iTunes错误删除导致的驱动丢失问题,所以最后我又把iTunes和QuickTime重新安装了回来。

5.重启。

恭喜!您的问题可能就此解决了!一点点经验,希望能给大家带来点帮助。

Monday, December 22, 2008

对Linux美化的一点点总结

一开始用Linux完全就是被可以自由更改整个系统的优点所折服。一直对Matrix有种着迷感,喜欢那种复古的绿色,于是一开始Linux的界面被自己做成Matrix的样子,很有成就感,包括Gnome KDE Fluxbox都被我成功的Matrixal过。之后出来Compiz Fusion又开始折腾特效,这一路走下来系统界面变换了无数次,但是大部分时间都用在这个上面了,前一段时间看RHCE认证觉得自己应该很Easy就过了,可是刚做的RHCE自我测试让我发现自己错了。用了三年Linux换了很多的发行版却只能在认证测试中得到21分,听人说要70分才可能过。唉,不过现在发现还不算晚,主要想告诉各位学习Linux一定要分清主次,不要浪费时间做没用的事情。这里是谈总结的,总得谈点界面美化的经验。
众所周知学习Linux需要很强的英语知识,一方面是命令都是英语的,另一方面国人在Linux汉化方面的工作做得很不够,包括国产Linux一样如此。系统里面中英文混杂的感觉很不爽,最不爽的是中文环境的Bash只能在X-windows里面正常显示,一旦系统出错进不了X了就得靠猜的了,所以玩Linux还是用英文的好,一般我的locale都会设置成这样的:
系统语言选择English (United States),这样就舒服多了。

在X的选择上我钟情于Gnome,从这点上看我就可能与Linux高手无缘。。。(以前总是看高手说自己钟情于KDE环境),Fluxbox等等资源占用率小的外壳是很帅,但是真的不方便,而且帅是仅限于系统的,如果要将美化应用到软件上就得学学QT了,应该是QT,我没有深入研究,不敢乱说。

Gnome系统美化最常用的网站当然就是大名鼎鼎的Gnome-look.org了,这个网站也是我每次重装系统后更新时必上的网站。应用GTK主题,图标包,在加上我最钟情的Conky(Conky是一个超轻量级的System Monitor软件)。我的Conky有两个,一个在顶上显示系统资源使用情况和时间等,还有一个在桌面右边显示具体系统资源占用情况,网络使用情况以及MPD播放器。给出两个config文件,想要的拿去,没时间改里面的具体内容,版权是别人的哦,我只作修改自用。

Config File 1----顶部:
# mod by uel
#avoid flicker
double_buffer yes
#no_buffers yes

#own window to run simultanious 2 or more conkys
own_window yes
own_window_transparent no
own_window_type widget
own_window_hints undecorated,sticky,skip_taskbar,skip_pager

# This is the number of times Conky will update before quitting.
# Set to zero to run forever.
total_run_times 0

#borders
draw_borders no
border_margin 2

#shades
draw_shades no
#draw_graph_borders yes
#draw_borders yes

#position
gap_x 1
gap_y 788
#alignment bottom_right
alignment bottom_left

#behaviour
update_interval 1

#colour
#default_color 000000
default_color D6D6D6
#default_color bfbfbf
#default_shade_color 000000
own_window_colour 202020
#draw_borders_colour 000000
#draw_graph_borders_colour 000000
#484432 95956B

#font
use_xft yes
xftfont BankGothic Md BT:pixelsize=12

#to prevent window from moving
use_spacer no
minimum_size 1278 10

#mpd
mpd_host localhost
mpd_port 6600
# ${offset -22}
##Mpd: ${color E8BCA7}${font}${mpd_smart}
##Swap: ${color E8BCA7}${font} ${swap} ${color 292929}
## Home: ${color E8BCA7}${font}${fs_free /home}
##${color E8BCA7}${time %A, %d %B}
##${color} Mpd: ${color E8BCA7}${font}${mpd_smart}${color 292929} ${color E8BCA7}${color}
TEXT
${voffset -1} Cpu1: ${color 9AB7DC}${cpu cpu1}% ${color 292929} ${color}Cpu2:${color 9AB7DC} ${cpu cpu2}% ${color 292929}<${color} P: ${color BB4E3F}${font}${processes}${color} R: ${color 7FBB3F}${font}${running_processes}${color 292929} ${color} Mem: ${color E8BCA7}${font}${mem}${color}${color 292929} ${color} Uptime: ${color 8D41CC}${font}${uptime_short}${color 292929} ${color E8BCA7}${font}${downspeed wlan0} Kb/s ${color} ${totaldown wlan0} down${color 292929} ${color} ${color E8BCA7}${upspeed wlan0} Kb/s ${color} ${totalup wlan0} up${color 292929} ${color}Main: ${color E8BCA7}${font}${fs_free /} ${color} ${color 292929} ${color}Temp: ${color D3BE4C}${font}${acpitemp}${color}C ${color 292929} ${alignr}${color}${time %A, %d %B} ${color E8BCA7}${time %H:%M}

Config File 2----桌面:
# set to yes if you want Conky to be forked in the background
background no

cpu_avg_samples 2
net_avg_samples 2

out_to_console no

#own window to run simultanious 2 or more conkys
own_window yes
own_window_transparent yes
own_windows_type widget
own_window_hints undecorated,sticky,skip_taskbar,skip_pager

# This is the number of times Conky will update before quitting.
# Set to zero to run forever.
total_run_times 0

#borders
draw_borders no
border_margin 1

#font
use_xft yes
xftfont BankGothic Md BT:pixelsize=12

#behaviour
update_interval 1

#colour
#default_color 000000
default_color D6D6D6
#default_color bfbfbf
#default_shade_color 000000
own_window_colour 202020
#draw_borders_colour 000000
#draw_graph_borders_colour 000000
#484432 95956B
# Text alpha when using Xft
xftalpha 0.8

#on_bottom no


# Use double buffering (reduces flicker, may not work for everyone)
double_buffer yes

# Minimum size of text area
minimum_size 260 5
maximum_width 300

# Draw shades?
draw_shades no

# Draw outlines?
draw_outline no

# Draw borders around text
draw_borders no

# Stippled borders?
stippled_borders no

# border margins
border_margin 4

# border width
border_width 1

# Default colors and also border colors
default_color white
default_shade_color white
default_outline_color white

# Text alignment, other possible values are commented
#alignment top_left
#minimum_size 10 10
gap_x 20
gap_y 40
alignment top_right
#alignment bottom_left
#alignment bottom_right

# Gap between borders of screen and text

# Add spaces to keep things from moving about? This only affects certain objects.
use_spacer no

# Subtract file system buffers from used memory?
no_buffers yes

# set to yes if you want all text to be in uppercase
uppercase no

# none, xmms, bmp, audacious, infopipe (default is none)
#xmms_player bmp

# boinc (seti) dir
# seti_dir /opt/seti

# Possible variables to be used:
#
# Variable Arguments Description
# acpiacadapter ACPI ac adapter state.
# acpifan ACPI fan state
# acpitemp ACPI temperature.
# adt746xcpu CPU temperature from therm_adt746x
# adt746xfan Fan speed from therm_adt746x
# battery (num) Remaining capasity in ACPI or APM
# battery. ACPI battery number can be
# given as argument (default is BAT0).
# buffers Amount of memory buffered
# cached Amount of memory cached
# color (color) Change drawing color to color
# cpu CPU usage in percents
# cpubar (height) Bar that shows CPU usage, height is
# bar's height in pixels
# downspeed net Download speed in kilobytes
# downspeedf net Download speed in kilobytes with one
# decimal
# exec shell command Executes a shell command and displays
# the output in torsmo. warning: this
# takes a lot more resources than other
# variables. I'd recommend coding wanted
# behaviour in C and posting a patch :-).
# execi interval, shell Same as exec but with specific interval.
# command Interval can't be less than
# update_interval in configuration.
# fs_bar (height), (fs) Bar that shows how much space is used on
# a file system. height is the height in
# pixels. fs is any file on that file
# system.
# fs_free (fs) Free space on a file system available
# for users.
# fs_free_perc (fs) Free percentage of space on a file
# system available for users.
# fs_size (fs) File system size
# fs_used (fs) File system used space
# hr (height) Horizontal line, height is the height in
# pixels
# i2c (dev), type, n I2C sensor from sysfs (Linux 2.6). dev
# may be omitted if you have only one I2C
# device. type is either in (or vol)
# meaning voltage, fan meaning fan or temp
# meaning temperature. n is number of the
# sensor. See /sys/bus/i2c/devices/ on
# your local computer.
# kernel Kernel version
# loadavg (1), (2), (3) System load average, 1 is for past 1
# minute, 2 for past 5 minutes and 3 for
# past 15 minutes.
# machine Machine, i686 for example
# mails Mail count in mail spool. You can use
# program like fetchmail to get mails from
# some server using your favourite
# protocol. See also new_mails.
# mem Amount of memory in use
# membar (height) Bar that shows amount of memory in use
# memmax Total amount of memory
# memperc Percentage of memory in use
# new_mails Unread mail count in mail spool.
# nodename Hostname
# outlinecolor (color) Change outline color
# pre_exec shell command Executes a shell command one time before
# torsmo displays anything and puts output
# as text.
# processes Total processes (sleeping and running)
# running_processes Running processes (not sleeping),
# requires Linux 2.6
# shadecolor (color) Change shading color
# stippled_hr (space), Stippled (dashed) horizontal line
# (height)
# swapbar (height) Bar that shows amount of swap in use
# swap Amount of swap in use
# swapmax Total amount of swap
# swapperc Percentage of swap in use
# sysname System name, Linux for example
# time (format) Local time, see man strftime to get more
# information about format
# totaldown net Total download, overflows at 4 GB on
# Linux with 32-bit arch and there doesn't
# seem to be a way to know how many times
# it has already done that before torsmo
# has started.
# totalup net Total upload, this one too, may overflow
# updates Number of updates (for debugging)
# upspeed net Upload speed in kilobytes
# upspeedf net Upload speed in kilobytes with one
# decimal
# uptime Uptime
# uptime_short Uptime in a shorter format
#
# seti_prog Seti@home current progress
# seti_progbar (height) Seti@home current progress bar
# seti_credit Seti@hoome total user credit


# variable is given either in format $variable or in ${variable}. Latter
# allows characters right after the variable and must be used in network
# stuff because of an argument
#${font Dungeon:style=Bold:pixelsize=10}I can change the font as well
#${font Verdana:size=10}as many times as I choose
#${font Perry:size=10}Including UTF-8,
# stuff after 'TEXT' will be formatted on screen
#${font Grunge:size=12}${time %a %b %d}${alignr -25}${time %k:%M}
#mpd
mpd_host localhost
mpd_port 6600


##${color a4a4a4}${alignc 2}${font DejaVu Sans Mono:size=18}${execi 1 ~/.conky/scripts/mpd.awk}
TEXT

${color #ffffff}CPU Usage PID CPU% MEM%
${color lightgrey} ${top name 1} ${top pid 1} ${top cpu 1} ${top mem 1}
${color #ffffff} ${top name 2} ${top pid 2} ${top cpu 2} ${top mem 2}
${color #ffffff} ${top name 3} ${top pid 3} ${top cpu 3} ${top mem 3}
${color #ffffff} ${top name 4} ${top pid 4} ${top cpu 4} ${top mem 4}
${color #ffffff} ${top name 5} ${top pid 5} ${top cpu 5} ${top mem 5}
${color #ffffff} ${top name 6} ${top pid 6} ${top cpu 6} ${top mem 6}
${color #ffffff} ${top name 7} ${top pid 7} ${top cpu 7} ${top mem 7}
${color #ffffff}Mem Usage
${color lightgrey} ${top_mem name 1} ${top_mem pid 1} ${top_mem cpu 1} ${top_mem mem 1}
${color #ffffff} ${top_mem name 2} ${top_mem pid 2} ${top_mem cpu 2} ${top_mem mem 2}
${color #ffffff} ${top_mem name 3} ${top_mem pid 3} ${top_mem cpu 3} ${top_mem mem 3}
${color #ffffff} ${top_mem name 4} ${top_mem pid 4} ${top_mem cpu 4} ${top_mem mem 4}
${color #ffffff} ${top_mem name 5} ${top_mem pid 5} ${top_mem cpu 5} ${top_mem mem 5}
${color #ffffff} ${top_mem name 6} ${top_mem pid 6} ${top_mem cpu 6} ${top_mem mem 6}
${color #ffffff} ${top_mem name 7} ${top_mem pid 7} ${top_mem cpu 7} ${top_mem mem 7}

${color #ffffff}Network: ${color lightgrey}${addr wlan0}

${color #ffffff}Down:${color lightgrey} ${downspeed wlan0} k/s $alignr${color #ffffff} Up:${color lightgrey} ${upspeed wlan0} k/s
${color #EEFF4F}${downspeedgraph wlan0 27,120 000000 ffffff 180} $alignr${color #EEFF4F}${upspeedgraph wlan0 27,120 000000 EEFF4F 25}
${color lightgrey}${totaldown wlan0} $alignr${color lightgrey}${totalup wlan0}

${color #ffffff}Port(s)${alignr}#Connections
${color #ffffff}Inbound: ${color lightgrey}${tcp_portmon 1 32767 count} ${color #ffffff}Outbound: ${color lightgrey}${tcp_portmon 32768 61000 count}${alignr}${color #ffffff}Total: ${color lightgrey}${tcp_portmon 1 65535 count}

${color #ffffff}Inbound Connection ${alignr} Local Service/Port${color lightgrey}
${tcp_portmon 1 32767 rhost 0} ${alignr} ${tcp_portmon 1 32767 lservice 0}
${tcp_portmon 1 32767 rhost 1} ${alignr} ${tcp_portmon 1 32767 lservice 1}
${tcp_portmon 1 32767 rhost 2} ${alignr} ${tcp_portmon 1 32767 lservice 2}
${tcp_portmon 1 32767 rhost 3} ${alignr} ${tcp_portmon 1 32767 lservice 3}
${tcp_portmon 1 32767 rhost 4} ${alignr} ${tcp_portmon 1 32767 lservice 4}


${font}${color 668ABF}${alignc}${voffset -15}${mpd_status}

${color 9AB7DC}Random:${color a4a4a4}${alignr}${mpd_random}

${color 9AB7DC}Artist:
${color a4a4a4}${mpd_artist}
${color 9AB7DC}Title:
${color a4a4a4}${mpd_title}
${color 9AB7DC}Album:
${color a4a4a4}${mpd_album}

${color a4a4a4}${mpd_elapsed}${alignr}${mpd_length}
${color 668ABF}${mpd_bar 3,85}

比如两个文件分别保存为.conkyrc_top和.conkyrc_desktop在用户目录的.conky文件夹里面。那么在/usr/local/bin/ 下面新建一个文件conky_all.
# sudo nano /usr/local/bin/conky_all

文件填入以下三行:
#!/bin/bash
conky -c ~/.conky/.conkyrc_top &
conky -c ~/.conky/.conkyrc_desktop
退出并保存。然后加入执行权限:
# sudo chmod +x /usr/local/bin/conky_all

加入到开机启动程序里面:
Main Menu >> System >> Administration >> Sessions >> Add
像这样填入:
这样就完成了,效果图:
还算可以吧,剩下的设置都很简单,就不赘述了。
总之,这只是我个人的经验,可以说单是Conky的经验,希望大家不要总把眼睛放在外在的东西上,多学点有用的东西才是第一位的。

下决心考RHCE了!

我性格中存在太大的惰性,只要不是下决心做的事情总是不会特别用心。想考RHCE已经很久了,一开始是时间不够的时候总想着学校考试为先,现在考完试了但用电脑还是不去做正事。只好下决心去做这件事了,可能会很难,但总比天天空想要好。今天做了下RHCE的自我评估测试题,共12页,似乎很差啊~!只有21分,需要进行培训。万事开头难~这个就留作通过认证考试以后看吧,Fight!

Monday, December 15, 2008

我又回来了<附博客模板>

以前自己建的博客挂掉了。。。所有文章丢失。。。我的心啊~~~只好回来了,还是Google的东西好哈,以前觉得Blogger的模板难看,网上找的又总用不了。为了稳定只好牺牲一下。我不太喜欢太复杂的模板,现在这个是用Blogger提供的基础模板Herbert上修改的,这个样子个人觉得还算满意。现在给出模板的代码,喜欢的就拿去吧:
<?xml version="1.0" encoding="UTF-8" ?>
<!DOCTYPE html PUBLIC "-//W3C//DTD XHTML 1.0 Strict//EN" "http://www.w3.org/TR/xhtml1/DTD/xhtml1-strict.dtd">
<html expr:dir='data:blog.languageDirection' xmlns='http://www.w3.org/1999/xhtml' xmlns:b='http://www.google.com/2005/gml/b' xmlns:data='http://www.google.com/2005/gml/data' xmlns:expr='http://www.google.com/2005/gml/expr'>
<head>
<b:include data='blog' name='all-head-content'/>
<meta content='GWGgp/NB6IXNcjSWRSnwinNduxUiVSTNeTzbQGwRt4M=' name='verify-v1'/>
<title><data:blog.pageTitle/></title>
<b:skin><![CDATA[/*
* Blogger Template Style
* Herbert
*
* by Jason Sutter
* Updated by Blogger Team
*/

/*
* Variable definitions
* ====================

<Variable name="mainBgColor" description="Page Background Color"
type="color" default="#ffffff" / value="#000000">
<Variable name="mainTextColor" description="Text Color"
type="color" default="#000000" / value="#008000">

<Variable name="titleBgColor" description="Blog Title Background Color"
type="color" default="#ff4500" / value="#008000">
<Variable name="titleColor" description="Blog Title Color"
type="color" default="#fffafa"/ value="#000000">
<Variable name="descriptionBgColor" description="Description Background Color"
type="color" default="#ffebcd" / value="#000000">
<Variable name="descriptionColor" description="Blog Description Color"
type="color" default="#9e5205" / value="#008000">

<Variable name="dateHeaderColor" description="Date Header Color"
type="color" default="#777777" / value="#008000">

<Variable name="postTitleColor" description="Post Title Color"
type="color" default="#555555" / value="#00ff00">
<Variable name="postTitleBgColor" description="Post Title Background Color"
type="color" default="#eeeeee" / value="#004000">

<Variable name="postFooterColor" description="Post Footer Color"
type="color" default="#444444" / value="#004000">

<Variable name="mainLinkColor" description="Link Color"
type="color" default="#de7008" / value="#00ff00">
<Variable name="mainVisitedLinkColor" description="Visited Link Color"
type="color" default="#e0ad12" / value="#004000">


<Variable name="sidebarTitleColor" description="Sidebar Title Color"
type="color" default="#ff4500" / value="#008000">

<Variable name="sidebarLinkColor" description="Sidebar Link Color"
type="color" default="#999999" / value="#00ff00">
<Variable name="sidebarVisitedLinkColor"
description="Sidebar Visited Link Color"
type="color" default="#de7008" / value="#004000">

<Variable name="bodyFont" description="Text Font"
type="font" default="normal normal 90% 'Trebuchet MS', Trebuchet, Verdana, Sans-Serif" / value="normal normal 79% Trebuchet, Trebuchet MS, Arial, sans-serif">
<Variable name="titleFont" description="Blog Title Font"
type="font" default="normal bold 266% Verdana, Sans-Serif" / value="normal bold 187% Trebuchet, Trebuchet MS, Arial, sans-serif">
<Variable name="descriptionFont" description="Blog Description Font"
type="font" default="normal bold 85% Verdana, Sans-Serif" / value="normal bold 85% Verdana, sans-serif">
<Variable name="postTitleFont" description="Post Title Font"
type="font" default="normal bold 110% Verdana, Sans-serif" value="normal bold 110% Verdana, Sans-serif">
<Variable name="sidebarTitleFont" description="Sidebar Title Font"
type="font" default="normal bold 125% Verdana, Sans-Serif" / value="normal bold 100% Verdana, Sans-Serif">
<Variable name="startSide" description="Start side in blog language"
type="automatic" default="left" value="left">
<Variable name="endSide" description="End side in blog language"
type="automatic" default="right" value="left">
*/
body {
margin: 0px;
padding: 0px;
background: $mainBgColor;
color: $mainTextColor;
font: $bodyFont;
}

a {
color: $mainLinkColor;
text-decoration: none;
}

a:hover {
color: $mainVisitedLinkColor;
text-decoration: underline;
}

a:visited {
color: $mainVisitedLinkColor;
}

a img {
border: 0;
}

@media all {
div#main-wrapper {
float: $startSide;
width: 72%;
padding-top: 0;
padding-$endSide: 1em;
padding-bottom: 0px;
padding-$startSide: 1em;
word-wrap: break-word; /* fix for long text breaking sidebar float in IE */
overflow: hidden; /* fix for long non-text content breaking IE sidebar float */
}

div#sidebar-wrapper {
margin: 0px;
padding: 35px;
text-align: $endSide;
}

div#sidebar {
width: 25%;
float: $endSide;
word-wrap: break-word; /* fix for long text breaking sidebar float in IE */
overflow: hidden; /* fix for long non-text content breaking IE sidebar float */
}
}

#navbar-iframe {
height:0px;
visibility:hidden;
display:none;
}

#content-wrapper {
margin-$endSide: 1em;
}


@media handheld {
div#main-wrapper {
float: none;
width: 90%;
}

div#sidebar-wrapper {
padding-top: 20px;
padding-$endSide: 1em;
padding-bottom: 0;
padding-$startSide: 1em;
text-align: $startSide;
}
}

#header {
padding-top: 0px;
padding-$endSide: 0px;
padding-bottom: 8px;
padding-$startSide: 0px;
margin-top: 0px;
margin-$endSide: 0px;
margin-bottom: 20px;
margin-$startSide: 0px;
border-bottom: solid 2px $postTitleBgColor;
border-top: solid 2px $descriptionBgColor;
background: $descriptionBgColor;
color: $descriptionColor;
}

CODE {
display: block; /* fixes a strange ie margin bug */
font-family: Courier New;
font-size: 9pt;
overflow:auto;
background: #191919 url(https://blogger.googleusercontent.com/img/b/R29vZ2xl/AVvXsEhnMMvmJSOQzhyK9f1RUhojYoYBtqRLgoWtzGQmV_N3sJdlBV18FpaueRHi3IMK-6at4npw6odc9aarQbYOpl68c4KKtuKNuM9JF0SwrM9PQ_Bjhje6AMXaKCiHcDJ_yLVWdwc9cHFwgOM/s1600/Code_BG.gif) left top repeat-y;
border: 1px dashed #00ff00;
margin:2px 3px;
padding: 10px 10px 10px 21px;
max-height:200px;
line-height: 1.2em;
}

blockquote {
display: block; /* fixes a strange ie margin bug */
font-family: Courier New;
font-size: 9pt;
background: #191919;
margin:1em 20px;
border:1px dashed #333333;
padding-left: 1ex;
}

h1 a:link {
color: $titleColor;
}

h1 a:visited {
color: $titleColor;
}

h1 {
padding-top: 18px;
padding-$endSide: 0px;
padding-bottom: 10px;
padding-$startSide: 5%;
margin-top: 0px;
margin-$endSide: 10px;
margin-bottom: 8px;
margin-$startSide: 0px;
border-top: solid 9px $sidebarTitleColor;
border-bottom: solid 1px $descriptionColor;
color: $titleColor;
background: $titleBgColor;
font: $titleFont;
}

.description {
padding-top: 0px;
padding-$endSide: 0px;
padding-bottom: 0px;
padding-$startSide: 5%;
margin: 0px;
color: $descriptionColor;
background: transparent;
font: $descriptionFont;
}


h3 {
margin-top: 0px;
margin-$endSide: 10px;
margin-bottom: 10px;
margin-$startSide: 0px;
padding-top: 2px;
padding-$endSide: 0px;
padding-bottom: 2px;
padding-$startSide: 2px;
color: $postTitleColor;
background: $postTitleBgColor;
font: $postTitleFont;
}

h3.post-title a,
h3.post-title a:visited {
color: $postTitleColor;
}

h2.date-header {
margin-top: 10px;
margin-$endSide: 0px;
margin-bottom: 0px;
margin-$startSide: 0px;
padding-top: 0px;
padding-$endSide: 0px;
padding-bottom: 0px;
padding-$startSide: 2%;
color: $dateHeaderColor;
font-size: 90%;
text-align: $startSide;
}

#sidebar h2 {
margin: 0px;
color: $sidebarTitleColor;
font: $sidebarTitleFont;
padding: 0px;
border: none;
}

#sidebar .widget {
margin-top: 0px;
margin-$endSide: 0px;
margin-bottom: 33px;
margin-$startSide: 5px;
padding: 0;
}

#sidebar ul {
list-style-type: none;
font-size: 95%;
margin-top: 0;
}

#sidebar li {
margin: 5px;
padding: 0px;
list-style-type: none;
font-size: 105%;
}

.Blog {
margin-top: 20px;
}

.blog-posts, .feed-links {
margin-$startSide: 10px;
}

.feed-links {
clear: both;
line-height: 2.5em;
}

.post {
margin-top: 0;
margin-$endSide: 0;
margin-bottom: 30px;
margin-$startSide: 0;
font-size: 100%;
}

.post-body {
margin-top: 0;
margin-$endSide: 6px;
margin-bottom: 0;
margin-$startSide: 5px;
}

.post strong {
font-weight: bold;
}

#sidebar a {
text-decoration: none;
}

#sidebar a:link,
#sidebar a:visited {
color: $sidebarLinkColor;
}

#sidebar a:active,
#sidebar a:hover {
color: $sidebarVisitedLinkColor;
}

pre,code,strike,blockquote {
color: #666666;
}

.post-footer {
padding-top: 0;
padding-$endSide: 0;
padding-bottom: 0;
padding-$startSide: 5px;
margin: 0px;
color: $postFooterColor;
font-size: 80%;
}

#comments {
padding-top: 2px;
padding-$endSide: 0px;
padding-bottom: 2px;
padding-$startSide: 5px;
font-size: 110%;
font-weight: bold;
font-family: Verdana,Sans-Serif;
}

.comment-author {
margin-top: 20px;
}

.comment-body {
margin-top: 10px;
font-size: 100%;
font-weight: normal;
color: $mainTextColor;
}

.comment-footer {
padding: 0px;
margin-bottom: 20px;
color: $postFooterColor;
font-size: 80%;
font-weight: normal;
display: inline;
margin-$endSide: 10px;
}

.deleted-comment {
font-style: italic;
color: gray;
}

.comment-link {
margin-$startSide: .6em;
}


/* Profile
----------------------------------------------- */
.profile-textblock {
clear: both;
margin-$startSide: 0;
}
.profile-img {
margin-top: 0;
margin-$endSide: 0;
margin-bottom: 5px;
margin-$startSide: 5px;
float: $endSide;
}

.BlogArchive #ArchiveList {
float: $endSide;
}

.widget-content {
margin-top: 0.5em;
}

#sidebar .widget {
clear: both;
}

#blog-pager-newer-link {
float: $startSide;
}

.blog-pager-older-link {
float: $endSide;
}

.blog-pager {
text-align: center;
}

.clear {
clear: both;
}

/** Tweaks for subscribe widget */
.widget-content .subscribe-wrapper {
float: left;
clear: left;
margin: .2em;
font-family: Arial,Sans-Serif;
}

/** Tweaks for layout editor mode */
body#layout #outer-wrapper {
margin-top: 10px;
}
]]></b:skin>
</head>

<body>
<div id='outer-wrapper'><div id='wrap2'>

<!-- skip links for text browsers -->
<span id='skiplinks' style='display:none;'>
<a href='#main'>skip to main </a>
<a href='#sidebar'>skip to sidebar</a>
</span>

<div id='header-wrapper'>
<b:section class='header' id='header' maxwidgets='1' showaddelement='no'>
<b:widget id='Header1' locked='true' title='iCNPunk --- Chinese National Punk (Header)' type='Header'/>
</b:section>
</div>

<div id='content-wrapper'>

<div id='crosscol-wrapper' style='text-align:center'>
<b:section class='crosscol' id='crosscol' showaddelement='no'/>
</div>

<div id='main-wrapper'>
<b:section class='main' id='main' showaddelement='no'>
<b:widget id='Blog1' locked='true' title='Blog Posts' type='Blog'/>
</b:section>
</div>

<div id='sidebar-wrapper'>
<b:section class='sidebar' id='sidebar' preferred='yes'>
<b:widget id='HTML4' locked='false' title='Search This Blog' type='HTML'/>
<b:widget id='Profile1' locked='false' title='About Me' type='Profile'/>
<b:widget id='HTML3' locked='false' title='Comments Here' type='HTML'/>
<b:widget id='TextList1' locked='false' title='Connect' type='TextList'/>
<b:widget id='Followers1' locked='false' title='Followers' type='Followers'/>
<b:widget id='BlogArchive1' locked='false' title='Blog Archive' type='BlogArchive'/>
<b:widget id='Subscribe1' locked='false' title='Subscribe To' type='Subscribe'/>
<b:widget id='HTML2' locked='false' title='Music Player' type='HTML'/>
<b:widget id='HTML1' locked='false' title='' type='HTML'/>
</b:section>
</div>

<!-- spacer for skins that want sidebar and main to be the same height-->
<div class='clear'> </div>

</div> <!-- end content-wrapper -->
</div></div> <!-- end outer-wrapper -->
</body>
</html>

Friday, September 08, 2006

Google Hackes

Need Free Proxy, let's see this:

Google free proxy!

Access restricted web sites using Google language tools service as a proxy.


A little tutorial found on the italian site
http://www.manuali.net/ inspired me for this hack. That tutorial suggests to translate a webpage, using Google translator, to access it even if restricted.

It worked fine but something else was needed... why translate?!

...

Ok, let's start from the beginning. We all know that Google is more than a search engine; we do use it as provider for email, mapping, news and many other services. Google is now also a free proxy service. Proxy is a device that stands between a PC and the internet, providing all the connections to the world wide web. What a proxy does is to receive all data from a requested site, so when you access web pages all data come from proxy.

What's the purpose for Google as a proxy? We often use office/school/university connections, usually those services are set to provide more safety, blocking the access to undesidered web sites (the "black list"). What you can do now is use Google translator service (language tools) as a proxy to bypass the restrictions set for our connection!

You just need to type the following URL:

http://www.google.com/translate?langpair=enen&u=www.forbiddensite.com
(www.forbiddensite.com stands for the URL you need to go to...)

What you'll get is the translation (english to english!) of the page you want to see... your connection is directed to a google.com page so this page won't be blocked (would be blocked only with google.com on the black list), no matter what's the content.

Notice that the URL has been a little hacked because the parameter "langpair"(1) is set to "enen" (english/english) so the page is processed by Google but you can keep the original language of the page (no need to translate!). If you need another language (e.g. french) you just need to set the parameter langpair to "frfr" and you'll be able to read french pages in french!

A couple of examples:

english... http://www.google.com/translate?langpair=en%7Cen&u=hacks.oreilly.com

Last but not least: if you use this trick, you're not sure to protect your privacy, this kind of connection lets you see blacklisted pages but doesn't hide your IP address. Just go to http://www.google.com/translate?langpair=en%7Cen&u=www.whatismyip.com to see your IP is not hidden...

That's all, bye.

Thursday, September 07, 2006

转载今天看的比较好玩的文章<2>


要了解美国请先到教堂


文/作者: 肖淑珍

布什总统就是虔诚的基督徒


当今世界,美国的身影在全世界闪现。每一个地方、每一个角落的问题,或者直接表现为美国问题,或者在背后与美国有千丝万缕的关系。一直不明白美国为何如此霸道,因为并不想简单地以“帝国本质”的评判阻隔深层的探究,便一直对这个问题耿耿于怀。

 “拯救世界”的全球关怀
  直至有一天,在街头的电线杆和一些私家车后窗,发现了“Save Tibet”(拯救西藏)的标语;在哈佛大学校园网站上又发现“世界大事记”栏目赫然写着“1751年中国入侵西藏,199年之后,此幕重演”,我想我已渐渐接近了模糊的答案。
  在美国你会明显地感受到美国人截然不同的两个侧面:
  美国人对于战争的态度狂热而一致。在美军以大规模杀伤性武器为借口入侵伊拉克之前,美国的民意调查显示,超过55%的美国人支持对伊拉克开战;现在,美国又用相似的手法,以核武器为名,欲将战争之剑挥向伊朗,美国最近的民意调查同样显示,有57%的美国人支持对伊朗宣战。只有在美国,才能切身感受到,居然有那么多的美国人,对战争的态度那么狂热,又那么惊人的一致,美国军政要员对世界各地的指手画脚有着广泛的群众基础。
  另一方面,泛泛而言,作为个体的美国人,他们整体上拥有较好的气质,散发着迷人的人格魅力。如果从美国启程回国,乘坐美西北航空公司的航班到东京转机,一下飞机,仿如瞬间从天堂到了人间。触目所及,来来往往的变成了亚洲人,气质便呈现出浓厚的世俗气息,与这一路在面前闪现的面庞和身影,形成了强烈的对比。气质是心灵与精神的外烁,境界的高低、内心的丰富与枯燥总会映透在外表。布什总统访华时曾在清华演讲:“95%的美国人信仰上帝,我是他们的其中之一。信仰是道德的核心,使人活出一种更高的标准。”一位美国人听说日本人多数不信仰宗教时惊呼:“那你们怎么对人民进行道德教化呢?”这或许就是东西方的精神差异所在,是基督教堂使东西方人的气质如此不同。或许因为信仰指向终极的意义和关怀,而不是现世的好处,便使美国人的气质呈现出精神性的超越。
  很长一段时间,我无法将头脑中的这两个碎片黏合在一起,一个具有高尚的精神关怀的民族何以会是一个蛮横的战争之国?我以为这是无法统一的两面。直到有一天发现了教堂,我的疑问才有了切实的答案,终于明白,美国人拯救世界的“全球关怀”来自于背后的教堂。
  波斯顿的大街上,教堂随处可见,尤其在哈佛校区的周围,三步五步之间,矗立着各个时期不同风格的教堂。凡是一个国家缺乏,另一个国家很兴盛的东西,总是彼此最大的不同。在美国,是各色各样的教堂,随时提醒着你国度与文化的不同。那些高耸入云的尖顶,总让人感受到一种精神的威严。我想,是宗教让美国人的精神直接与天堂相通,空灵的关怀升华、雕刻着他们的心灵与外表,但是也使他们的“全球关怀”表现出傲慢、无情甚至残暴。作为个人,基督教信仰使他们表现得那么美好;作为国家,基督教信仰又使美国那样不可理喻地强横。
  

“你必须同我一样” (这句我认为最经典)
  ……

转载今天看的比较好玩的文章<1>

美国分析世界陆军前20,中国陆军拿第一

世界陆军中国第一: 世界十大陆军:中国列第一,美国第二,俄罗斯列第三 从数量和质量上看,这个星球上陆军实力最强大的10个国家依次为:中国,美国,俄罗斯,印度,朝鲜,韩国,土耳其,以色列,巴基斯坦和伊朗。美国未排名第一的原因在于,虽然我们的地面部队也很强大,但装备和训练方面的优势只是抵消了与中国部队的数量优势。我们可以看到50年前在朝鲜,中国人利用其人力优势弥补了技术劣势并与我们打了个平手。这一幕可能还会重演。

  美国的军费预算相当于10大军事强国每年国防开支总额的一半左右。这么多的军费使美国得到几方面的特殊好处。首先,美国海军无可争议地成为世界各大洋的霸主。任何对手与美国舰队相对抗几乎必败无疑。他们顶多可以指望造成一些破坏,甚至连做到这一点也不那么容易。第二个好处是美国是唯一能向全球任何地方大量投送兵力的国家。美军可以迅速做到这一点,这本身就是一种优势。因为首先到达将使美国更好地控制局势。美国每年还花费数十美元(开玩笑吧 是翻译错误还是什么,值得深思)用以维护全世界最大的核武库。而最重要的可能还是美国每年花费数十亿美元用于世界上最大规模的情报收集机构。我们可能不会什么都知道,但一般而言我们比其他任何人都知道的多。

  其他几国的陆军在其周边地区都是实力最强大的。这也是他们如此危险的原因,因为其中任何一支军队都强大得足以入侵其任何一个邻国,而它们周边的大多数国家都不军具备这么强大的军事实力。有时,也会出现同一地区的两个国家都拥有强大军队的情况,例如朝鲜与韩国及印度与巴基斯坦。有文字记载以来的历史表明,这种情况往往导致紧张局势。在大多数情况下,这些武装到牙齿的对抗都引发了战争。就朝鲜半岛而言,超级大国的政治利益和核武器的威胁,以使两国维持了近半个世纪的和平局面。印巴局势则更为紧张,特别是自1998年两国都成功试爆了核武器后,局势日益恶化。这两个邻国曾在1965年和1971年爆发过两次战争,巴基斯坦都遭到了惨败。1999年初,一场小规激战在克什米尔印巴边界的高山地区爆发。巴基斯坦否认其卷入冲突,并将责任推到了克什米尔反叛者身上。由于核武器被视为确保国家生存的最后保障,所有人都担心印度将使用其数量占优势的坦克部队入侵巴基斯坦,从而使战事升级。如果出现这种情况,巴基斯坦唯一的选择只能是投降或使用核武器。因为两国都拥有数十枚核弹头,其结果将导致数百万人死亡,对大气造成严重辐射污染。之所以出现这种情况,主要在于两国都拥有强大的军事实力。

  10大军事强国中的其他国家也存在一些问题。伊朗仍被认为对其阿拉伯邻国构成威胁,在两伊边界地区武装集结了大量的部队,但主要是为了防备全副武装的阿富汗毒贩越界。土耳其和希腊素有结怨,导致双方不断相互攻歼,言辞激烈,但是希腊人已远不是土耳其的对手。同时,土耳其还需镇压其国内的数千名库尔德反政府武装。土耳其的阿拉伯邻国在领土和水资源问题上与土耳其其也有分歧,但土耳其同样以其强大的实力确保这些矛盾不致爆发。

  以色列(还有瑞士)军队情况特殊。它们属于“快速动员”部队,能在几天内动员50万受过训练的平民转入现役,并使其做好作战准备。以色列在中东战争中多次证明了这些部队具备很强的作战能力。

  俄罗斯强大的“红军”由于苏联的解体而正在瓦解。但是俄罗斯军队已经开始重建,这可能需要10年甚至更长的时间。俄罗斯的邻国正紧张地关注着这一进程。

  陆军实力排在第二战线的10个国家或地区是:德国,台湾,越南,法国,埃及,瑞士,意大利,日本,英国和巴西。德国仍然处于冷战后削减军队规模的过程中,它正在建立一支更适合执行维和任务的军队。台湾仍然在为战争做准备。埃及和巴西拥有一支质量值得怀疑的庞大军队。但是对于巴西来说,它的邻国比它都要弱的多。埃及必须防备以色列,当然自从埃以缔结和约后,倒是其邻国利比亚和苏丹需要担心数量庞大的埃及军队。

  军队规模的确具有重要意义,这也是规模最大的10国陆军在新闻中出现频率最高的主要原因。
(这是美国排的)我只知道抗美援朝后美国五星上将说;谁他妈的和中国陆军打仗谁是疯子.

from: jczs.news.sina.com.cn 发表人: 伏波生

Tuesday, August 29, 2006

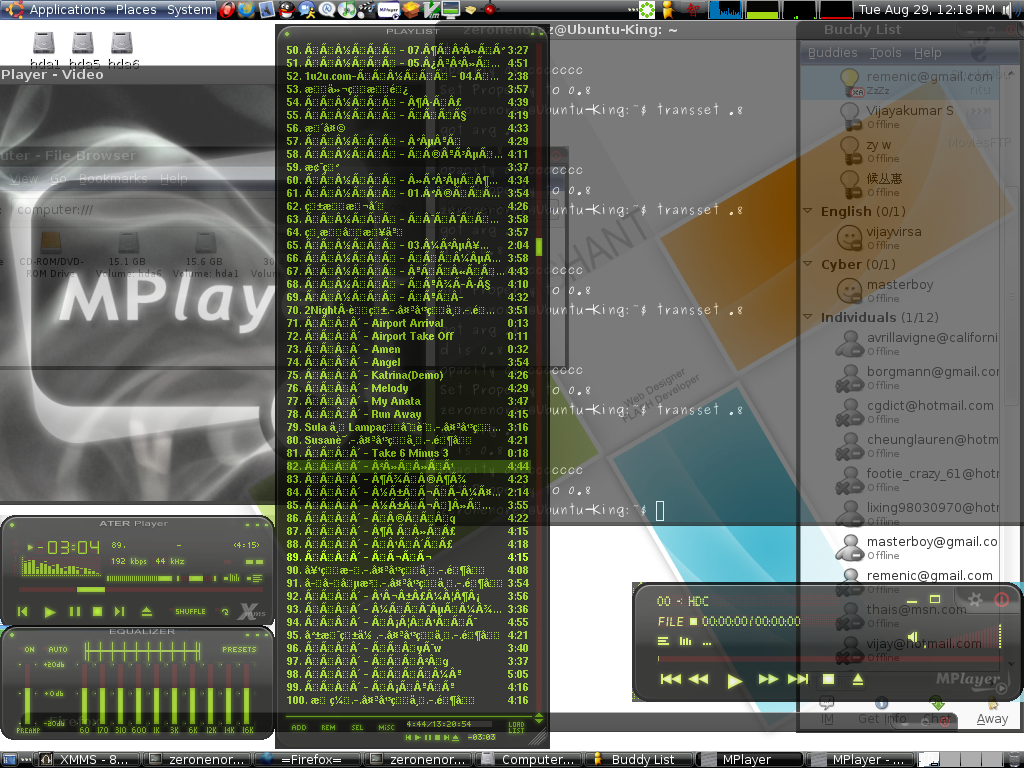
Use Transparent To make windows all transparent

I saw many themes in Gnome-look.org have transparent. Then i download them but found not seem as the screenshot. I feel cheated!

But yesterday,actually is 3:00 AM today's early morning. I found him-Transset.
USE $sudo spt-get insta transset to install.
but when i type
$transset
in Terminal and Enter ,there only is a Harrow and i check a window but nothing happened.
i try many times but still can't make transparention.

use google to study!

I frond that i need an app called: xcompmgr
use $sudo apt-get install xcompmgr
to get it
then Alt-F2 run xcompmgr after to close some windows.
use $transset .* (*=5 mean 50% transparent)
to change windows_type.
Then I got this:


Great test completely :->
Copyright © 2006 - 2009 iCNPunk.BlogSpot.COM All rights reserved By ZerOnenOreZ & Blogger
Template Designed By iCNPunk Fixed for IE7